Friday, February 12, 2016

8 Practices, Tools, and Routines that Foster Independence During Writing Workshop


"Teacher?  How do you spell _______?"

We've all heard this question countless times, especially in the beginning of the year.  So, the challenge for teachers becomes: How do we help students develop confidence in themselves as writers, so that they rely less on us?

The answer?

Tools and routines!

Give students the tools and routines they need, and they will assume the responsibility for their writing!

Mrs Rios Teaches: 8 Practices, Tools, and Routines that Foster Independence During Writing Workshop

Here are some tools and strategies that I share with my young writers:

1) First of all, clearly communicate that you value content and voice, over spelling words correctly.  If students feel like spelling the words correctly is the most important aspect of writing, they will become bogged down in the tediousness of making sure every. single. word. is. spelled. just. right.  That leaves very little brainpower for creativity and craftsmanship. (P.S. - I'm not saying that it is not OK to hold students accountable for some agreed upon high frequency, or word wall/sight words. Just keep it reasonable.)

2) Motivation! The two biggest motivators for young writers are a) choice and b) an authentic audience and purpose. I know what you're thinking. "But, I've got district tests to administer! I can't just let my students write about Minecraft all year!" Here's the thing. Writers are passionate, curious, and maybe just a bit obsessed, by nature. If you embrace the idea of allowing your students to choose their topics, you will be amazed at how engaged they will be, during writing workshop. So, yes! You actually you can have a student write about Minecraft all year long. In fact, I have one this year. He has written a story about "Creepers", an elaborate "how-to" guide to Minecraft, and has shared several opinions and book recommendations, all about Minecraft. He has also written about tigers, bats, his family, and created a whole new chapter book titled "The Crazy Stick Family." What I am saying is, try to be flexible.

The other big factor here is audience and purpose. Ask yourself, "Who reads my students' writing?" If the answer is "only you," that is part of the problem.  Students need opportunities to share their writing on a daily basis with an audience, and preferably, an audience that extends outside of the four walls of your classroom. So, have students read their pieces to their book buddies, send students up to the principal to share their writing, have a Family Writing Night. Get creative, so that students feel that their writing has true purpose.

3) One of the first mini-lessons I do in the beginning of the year is modeling stretching out sounds.  The whole point of writing is to communicate.  So, teaching students to do their best to sound out words and write as many sounds as they can, is an invaluable lesson for young writers.  (P.S. This lesson directly connects to the Stretchy Snake reading strategy.  Make that connection between reading and writing whenever possible for students!)

Mrs Rios Teaches: 8 Practices, Tools, and Routines that Foster Independence During Writing Workshop

4) Sound-Spelling Cards:  Ok, I am thinking back to a time that brings back hard feelings.  Our district participated in the Reading First Initiative.  We underwent countless hours of mandatory trainings, and were expected to maintain 100% fidelity to our basal. Blech! Dark days, friends.  Dark days.

One good thing (there were a few) that came with that, were our Sound-Spelling Cards, which I still use to this day.  These are an excellent visual in the classroom to communicate to students the idea of being FLEXIBLE when it comes to spelling words. This tool requires multiple mini-lessons throughout the year, in order for kids to use them regularly, and effectively.  I have the large versions posted along the top edge of our front wall.

Mrs Rios Teaches: 8 Practices, Tools, and Routines that Foster Independence During Writing Workshop

I also love the little desk versions, as well.  (I give one to each of my emergent writers, and keep a set of 6 at my teaching table for conferencing.)

Mrs Rios Teaches: 8 Practices, Tools, and Routines that Foster Independence During Writing Workshop

There are some free ones (not the same ones I have though) on TPT, if you search "Sound Spelling Cards".

5) Using Resources: Each of my students has a writing folder.  Inside, each students will find:

Mrs Rios Teaches: 8 Practices, Tools, and Routines that Foster Independence During Writing Workshop

**Writer's Dictionary:  Once again, this is the kind of tool that requires multiple mini-lessons throughout the year.  Model using it often for your students in your own writing. TIP: If my students can't find a word in their dictionary, they think of the first sound/letter in that word, open to that page, and raise their dictionary in the air. As I wander through the room and conference, I will write a word (if it is not decodable), as needed. Students do not come to me, or follow me around, because that would make me crazy.

Mrs Rios Teaches: 8 Practices, Tools, and Routines that Foster Independence During Writing Workshop

**Parts of Speech Flipbook: I made this interactive flip book so that my students would have something to refer back to all year long when we talked about good writing. We use it as a place to collect words we love! Teaching students to read like writers is a very powerful practice. When students are reading and come across a word that they find particularly interesting, they jot it into their flip books. The fact that students have to categorize their favorite words by parts of speech, is a great way to reinforce grammar skills.

I have this available as a FREEBIE in my store (The freebie includes nouns, verbs, pronouns, and adjectives), or for purchase in the larger sized version you see above. It is faster to assemble and includes nouns, verbs, linking verbs, pronouns, adjectives, adverbs, and more. Click on the image below to learn more about either version.

Mrs Rios Teaches: 8 Practices, Tools, and Routines that Foster Independence During Writing Workshop

**Writing Tools Flipbook: I created this flip book as a reference tool to help my students with specific areas of writing. This book was created with 2nd grade in mind, but teachers of 1st-3rd have found it useful, too. 
Mrs Rios Teaches: 8 Practices, Tools, and Routines that Foster Independence During Writing Workshop

Inside, my students can reference...

*quick refreshers of previous mini-lessons


Mrs Rios Teaches: 8 Practices, Tools, and Routines that Foster Independence During Writing Workshop

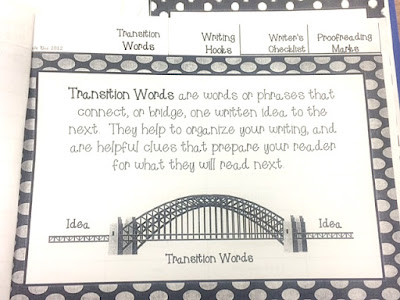
*lists of transition words


Mrs Rios Teaches: 8 Practices, Tools, and Routines that Foster Independence During Writing Workshop

*ideas for writing hooks


Mrs Rios Teaches: 8 Practices, Tools, and Routines that Foster Independence During Writing Workshop

**writer's checklists for narrative, opinion, and informative writing

** and a proofreading marks page

6) Writing Partnerships and Classroom Experts: Writing partnerships are a wonderful way to share expertise in the classroom. The more your students see each other as helpful resources, the less apt they will be to only turn to you.  Writing partners ask each other for help, share their writing, and give feedback and encouragement to each other. Pair students together that compliment each other. Think about each student's strengths and weaknesses, and use that to make your partnerships. A student who is a poor speller might pair well with a child who rocks at it. A young writer who struggles with ideas might benefit by working with a student who sees story seeds everywhere! From my learning, partnerships work best when they are stable, so try to maintain the same partnership for each unit, or at least a few months.

I love this idea of "Classroom Experts" from Writing Workshop: The Essential Guide, by Ralph Fletcher. (affiliate link below)

Mrs Rios Teaches: 8 Practices, Tools, and Routines that Foster Independence During Writing Workshop

It is a new one for me, but perfectly matches my philosophy, as described above. Make your students the experts! In his book, he suggests making anchor charts that list different areas of writing, for example: spelling, complete sentences, word choice, story ideas, writing hooks, paragraphs, dialogue,  editing, or revising, and then writing students' names underneath those categories, if they have proven to be especially good in one of the aforementioned areas. Students who are struggling with one of these areas, can refer to the chart, and then seek out a conference with the expert. He even suggests that students make appointments with the expert. I just love it! Genius!

7) Checklists and Anchor Papers:  I am a big believer that students will rise up to whatever level of expectations we set. So, whenever we start a new type of writing, I like to provide an exemplar for my students to study. Once again, this goes back to having students read like writers. They look at these anchor papers to notice the elements of that type of writing, the structure, and other evidence of author's use of craft (word choice, sentence length, etc...)

We use our classroom observations to construct the beginning of a checklist. I add anything else from my district's rubrics, that I know the students will need to be successful. I usually add it after a mini-lesson, so that my students don't become too overwhelmed. Here is a shot of our Informative Writing checklist. We added "text features" to this chart later on.

Mrs Rios Teaches: 8 Practices, Tools, and Routines that Foster Independence During Writing Workshop

So, where do I get these anchor papers, you ask? Well, I have some from Lucy Calkins' Unit of Study kit, but I also save any really good writing from previous years. You could also coordinate with others at your grade level. Just make a copy, and hold onto it.  While I prefer to use student writing, you can always model with your own writing, as well, as part of your mini-lessons. Kids need to see us write regularly!

8) Anchor Charts:  Leave tracks of all of your mini-lessons by making anchor charts, and leaving them up around the room, at least for the duration of your unit. Some charts will prove to be timeless, however. (Reality Check: I don't know about you. But, I may just be an "anchor chart-aholic." Real estate in which to hang an anchor chart is at a premium in my classroom. So, one tip I have, is to take pictures of any anchor charts that you intend to take down, and make a binder/poly folder with all of the pictures. It can be a very helpful reference tool, and comes in handy during conferences and small group work. I do the same with all my reading anchor charts, too. Makes it so easy when it is time to make the chart again, the following year.)

Looking for more writing ideas? Follow me on Pinterest!


Alright, that is it, my friends. I hope you found some interesting nuggets to use in your classroom. I would love to hear what successes you have had in your classroom with regards to developing independent writers. Share, by leaving a comment below.

Nicole
Monday, February 8, 2016

Vocabulary Instruction That Sticks & Presidents' Day

Click on the image below for a fun idea for Presidents' Day AND some effective tips for vocabulary instruction that sticks!


Have a great week!

Nicole

Saturday, January 30, 2016

5 Ideas for Grammar Instruction in the Primary Grades

Just revised this "oldie but goody." Click on the image below to read about effective, authentic, and meaningful ideas for teaching young writers about grammar.

Effective, authentic, and meaningful ideas for teaching young writers about grammar.

Enjoy!

Nicole

Saturday, January 23, 2016

So Cal Winter Blog Hop & Giveaway


Welcome!

I am thrilled to be partnering up with Kristen from Easy Teaching Tools and some other "Californiarific" - yeah, I just made that up - bloggers for the So Cal Winter Blog Hop & Giveaway! 


So what are my favorite things about Southern California? Well, I live in San Diego, so you probably expect me to say the San Diego Zoo, Balboa Park, or Sea World. These are definitely popular places to visit, if you are down in my area. But, I'm going to share the top 5 things I love most about my hometown!

1) Let's get the expected out of the way.... the BEACHES ... of course!  

There are many beautiful beaches in San Diego. But, my favorite beach is behind the famous Hotel Del Coronado. There is really nothing more relaxing than reading a book, and watching your kids have fun on the beach! This beach is extra special because you have "the Del" on one side, and it has a wonderful little tide pool area on the beach side, where little ones can look for crabs and other sea creatures. (If you plan a visit, come at low tide.)


2) Hiking! 

I, like many So Californians, am an outdoorsy kind of person. I love being out in nature, and use it as my gym, as often as I can (which is not often enough). If you ever come to San Diego, you have to walk Torrey Pines. It has beautiful ocean views, and is easy enough for anyone 5+.  


If you are looking for something a little more rigorous, try hiking Iron Mountain! It's about a 1,067 gain in elevation, and is just around 6.5 miles round trip. Afterwards, you can continue up the CA-67 to the town of Julian, where you can have some of their famous apple pie!

Just a sidenote: I have a personal goal to complete the 52 Hike Challenge this year!

3) Little Italy Farmers Market

I love this Saturday tradition. Great vendors, produce, and people! Here you can find the freshest uni and oysters, delicious samosas, juices, flowers, vegetables, and handmade crafts.


Potato and pea samosa with
spicy chutney.
This Saturday, I scored pastured eggs, bitter escarole,
and some beautiful romanesco broccoli.


4) More Food?  Ummmmm....Yes.  I know.  It's shameful.  And I, am absolutely shameless. Move along, friend... ooey, gooey, sweet and sticky things lie ahead.

I am a hopeless foodie! Trying new restaurants, and going to food festivals with my husband, is one of my favorite things to do!

After the farmers market, since you are already in the neighborhood, I would definitely walk the couple of blocks that it would take to get to Extraordinary Desserts. They are beautiful and tasty. I took home some chocolate chip cookies for my kids, and a passionfruit-mango cheesecake (for research purposes only). 

Maple Bacon Donuts from Great Maple Restaurant. Love!
Latin Food Festival 2015
5) Big Bear Mountain

Ok, this is not in San Diego, and I know that the last thing some of you want to see is more snow.  But, just 3 hours from here is some darned good skiing! Look at that view!


Ok, I think I have flaunted enough of just how fabulous a place So Cal is to live, work, and play in.

Moving on! I wanted to share a quick tip with you. My greatest passion as a teacher is literacy! Here is a practical tip that teachers, grades 1-2 and up, can use in their classrooms, to introduce summarizing!

One Word Summaries!

I first learned this simple strategy from Stephanie Harvey in her book, Strategies that Work. (affiliate link below)

All you do is have the students write down one word that represents the most important idea from each paragraph of a text. (Sometimes students' word choices are debatable, and lead to great discussions in the classroom. Ask students to justify their choices! Often, there is more than one correct answer!) Then, the student uses their word list to construct their own oral, or written, summary of the text. This is great for giving students practice with determining importance, and paraphrasing, as well! I've used this technique, very successfully, with articles inside of Scholastic and Time magazines. But, it also works with other multi-paragraph texts, as well.

Want to try it out? I've attached a sample of a "One Word Summary" from my Polar Bear Plunge pack!
Click here to preview this pack.
Grab your freebie, here!
I hope you, and your students, enjoy this activity! 

Thanks for stopping by! Please consider following me on my blog, Pinterest, and on Twitter! 

Now, hop on over to....

a Rafflecopter giveaway

Sunday, November 1, 2015

Inquiry in the Primary Grades, Part 3

Ok, if you have been following this series, you can probably tell, I am nothing, if not thorough. We are already at post # 3, and I've barely even touched on our main subject for inquiry...Bats!  Oh, well! The foundation has been laid, and it will serve my students and me well over the next few weeks.  Let's get started by looking at the first two stages of an inquiry cycle... Immersion and Investigation! (Stephanie Harvey and Harvey "Smokey" Daniels)

During the Immersion phase you will...

1) Plan with your Essential Question and topic in mind: If you remember from Part 1, I worked with the kids on constructing our Essential Question: How Do Bats Survive in their Habitats?  From there, I planned what skills and strategies I wanted my students to practice. For example: researching, non-fiction text features, main idea & detail etc... (all of these fitting nicely, into my district's current unit of study, for 2nd grade)

2) Gather materials and resources: Ok, this was interesting. This year,  I could not find one resource on bats, even in our largest public library. (It probably did not help that it was a few weeks before Halloween.) At first, I will admit, I started to panic a little. I mean the kids were all set to study bats. We had all these questions. I was worried that maybe we would have to scrap it, and start brainstorming a new inquiry topic. Thankfully, I kept my head, and realized that many of my students already had experience from first grade, using books to do research. I felt like the "teaching gods" were telling me that this was my opportunity to expose them to research in a different way. But, what?....Digital! Oila! There it was. One area I knew my students were weak in, was using digital resources.  So, I decided that those lessons would have to be incorporated into our inquiry unit.

Don't get me wrong. We are still are using books, too.  I had a few of my own, plus some Time For Kids and Reading A-Z books, that I had already printed out. One of our first grade teachers even game me an awesome non-fiction, Bat reader's theatre! But, online resources have definitely been, and will be, the heart of our learning.

(This is where I became really happy because I had found that awesome webmix from Matt Sutton on Symbaloo, and it is all about bats. You can find it in Part 1 of this blog series.  I, of course, previewed all of the resources ahead of time, so that I was familiar with their content, and what learning opportunities they could offer my students.

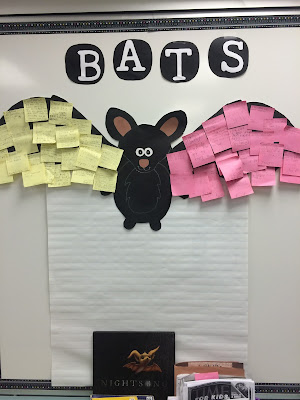
3) Immerse the students in the topic of inquiry:   In this stage, you are trying to build excitement, and curiosity about your topic. Before we dove into the fascinating world of bats, I had my students write down some things they already thought they knew about bats.  They wrote them on a post-it, and I added them to our bat chart.


We also did some shared reading, and kept track of our questions! We began using the language of learning and inquiry, to talk about our thoughts with our partners. "I learned..., I wonder..., I noticed..." What I love about inquiry, is that students really begin to realize that learning is a never-ending cycle. Each day that we learned something new about bats, we also had new questions! We posted our questions on our bat chart, too.

During this time, I also started to model how to take notes, and keep my learning organized.  I introduced bullets and codes like "L" for "new learning", and "Q"  for question. In addition,  I modeled how to "read" a photograph and diagram, and use labels and captions.


They even practiced reading and writing their own.


The immersion phase sets the students up for success in the next phase...Investigation!

During the Investigation phase you will...

1) Model for students "how to read with a question in mind": I pulled a pink post-it off of the bat chart. These are student questions. It seemed random to my students. But, I had already previewed their questions earlier, and had found the perfect question to begin our investigation. "Where do bats live?"  I gave credit to the student who had written the question. They love that!

Next, we made a T-chart for our topic. Notice that I wrote, "What We Think We Know About Bats." This is important, because we want students to be flexible enough to be able to change their thinking, when they are presented with new information.


I then modeled how to use a table of contents to find the section of the book that would answer the question. The students caught right away that they don't have to read non-fiction from beginning to end. We added that to our Fiction/Non-Fiction board from Part 2.  Yes! I love these kids!

Before I began reading,  I stressed that, as researchers, we have a responsibility to ensure that we share information that is correct. I gave them their purpose: 1) to listen for new information about where bats live, and 2) to verify, or discount, our original beliefs about bat habitats.  Then, I read aloud from the page about bat habitats, modeling my thinking and learning, while the students jotted their own thoughts, onto their whiteboards. Afterwards, we added the new information onto our chart, and placed checks next to the ideas that were confirmed by the text.

Then, after a quick review of our "collaborative rules," students practiced this in small groups, with additional bat books. They also used online resources during our computer lab time!


Woohoo! Look at those bullets! We are getting there!

At the end of the day, we came back together to discuss our findings. Some ideas were still unconfirmed, others were verified. We required others to confirm our new learning, and to cite their sources. Students agreed, and disagreed, with one another. We practiced our discussion etiquette, and students used sentence stems that I had provided for them.  In the end, we added quite a bit of new learning to our T-chart. (Don't forget to discuss the process as well, and add to your "Collaboration Rules" if necessary.)


We then repeated this whole process, the next day, with other questions from the bat chart. I chose questions from the chart about diet, adaptations, and the life cycle. The students went off to investigate their question with great enthusiasm! I walked around and conferred with groups and individuals, and took notes about accomplishments, challenges, and next steps.


At the end of the week, we had researched all of the questions most closely related to our Essential Question.  They were also given time to research their individual questions.  

It was a very busy week! But, also a week of tremendous learning and growth! I hope you are starting to see how you can make inquiry work for you and your students.

Check back next week for Part 4, on stage 3 in our inquiry cycle...Coalescing!

Nicole


LinkWithin

Related Posts Plugin for WordPress, Blogger...